sábado, 29 de marzo de 2014

Servomotor with Position Recall

One of the annoying things when using servos with Arduino are those setup movements every time we switch on the board.If the servo is linked to something carefully positioned, we will loose the reference every time that power is cycled.

We may avoid this effect by storing the position of the servo in the non-volatile memory. Arduino allows us to access 512 registers (say, memory slots) that will survive while it is powered off, kind of storing the info in the hard disk drive of a computer.

The assembly and code below will move 20 degrees of a servomotor and store the end position every time the button is pushed. When the board is switched on, the servo is not moved to a default position but it first checks if there is a proper value in the EEPROM and if so, it will use that as the starting value for the servo.


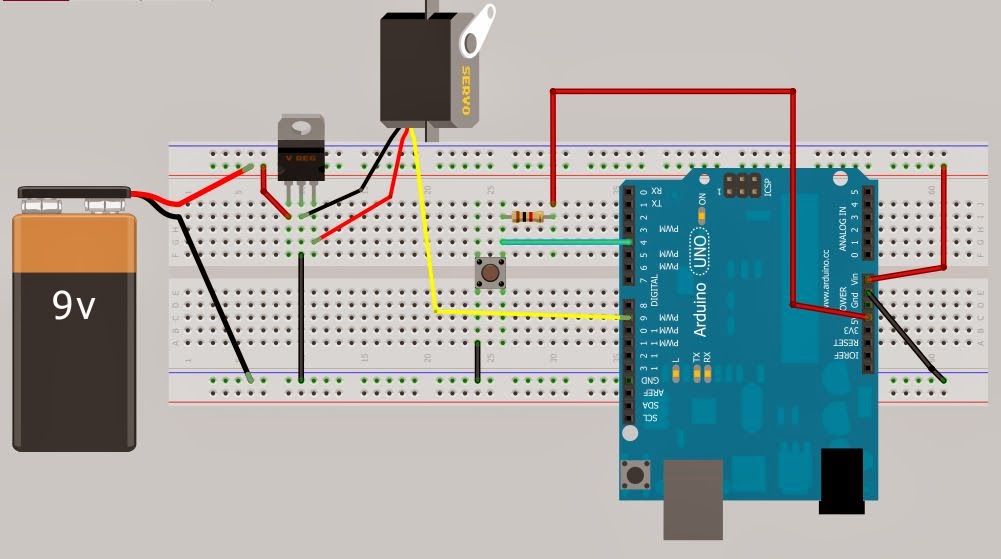
Electrically, the 9V battery feeds the Arduino power through Vin pin, and the servo through a 7805 voltage regulator. For a quick and dirty check, you may connect your servo to the Arduino 5V pin instead of using the voltage regulator, but I am always wary of using Arduino pins in power applications.

The pushbutton is pulled up to 5V through the 1k resistor and will yield a 0 to the digital pin #4 when pushed.

You will find more details and examples on how to manage non-volatile memory at the EEPROM libray description.

// SERVO_MEMORY

// Controlling a servo position using a switch, will
// turn moveDegrees every time the switch is pushed
// and change the direction once it reaches the end. 
// The position is recorded in the non-volatile memory so the 
// position of the servo is kept if switched off an on.

// by Carles Flotats, March 2014, after the servo, EEPROM
// and fade examples

#include <Servo.h> 
#include <EEPROM.h>
 
Servo myservo;  // create servo object to control a servo 
 
int switchPin = 4;  // pin used to connect a pulled up button
int val;            // variable to store the servo position
int moveDegrees=20; // degrees to turn for every button push

int memoryPos=5;    // memory slot to store the position


void setup() 
{ 
  val=EEPROM.read(memoryPos);   //read the stored position
  if (val < 20  || val > 160){  // if it is not a valid position
    val=20;                     // assign a default value
  }
  
  //Serial.begin(9600);
  pinMode(switchPin, INPUT);
  
  myservo.attach(9);  // pin 9 controls the servo  
  myservo.write(val); // moves to the stored position
} 
 
void loop() 
{ 
  //Serial.println(digitalRead(switchPin));
  
  while(digitalRead(switchPin)){  // wait for button pushed
    delay(10);
  }
    val=val+moveDegrees;        // increase the position

  //Serial.println(val);
  myservo.write(val);                // sets the servo position 
  EEPROM.write(memoryPos, val);     //stores the current position
  delay(500);                   // waits for servo to get there 
  
  if (val == 20 || val == 160) {    // if the servo is at the end
    moveDegrees = -moveDegrees ;   // changes the movement direction
  } 
} 

sábado, 18 de enero de 2014

An Arduino Based Shannon Machine

A Shannon machine has only one function: to switch itself of. The irony of its simplicity has captured me for long, and when I started tinkering with Arduino this was one of the first projects that came to my mind. 

 As a starter, have a look at the video of the finished project, and keep on reading if you are interested.


I started the project with an Arduino Nano, the Chinese copies are around 5 euro these days. Then I realized that it would not fit in the box if I also had to include the 9V battery. So I switched to an AtTiny 85, a microcontroller from Atmel with a very small form factor and just 8 pins. They are ideal if your project is tight on space and/or budget and are easily programmable from the Arduino environment, just follow these instructions

The Tiny must be fed at 5V, so I added the 7805 voltage regulator. Maybe a 78L05 would do, but the motor is eating more than 300mA when it is closing the switch and I felt more comfortable with the extra dissipation that the 7805 provides.

As a motor I am using a microservo. These kind of motors can turn 180 degrees and have a built in position control. They are really easy to wire: red cable for power, black or brown cable for ground and yellow cable to send the commands. Arduino has the <Servo.h> library which allows you to send commands directing the motor to a certain angle. If you are using the AtTiny, you will have to download and use <SoftwareServo.h> instead.


The shopping list


  • A box, some 3 euro 
  • SG90 microservo, less than 4 euro at dealExtreme
  • 9V battery and its connector
  • microcontroller AtTiny 85, 1 to 1.5 euro at RS or other online shops
  • Switch
  • LED
  • 7805 voltage regulator
  • 4.7 and 0.1 microfarad capacitors
  • 470 and 10K ohm resistors

The Schematics


or in a more realistic representation thanks to Fritzing:


The Arduino code

//Shannon Slow Detach Attiny85

// Carles Flotats, December 2013

// It reads the switch (pull upped). If activated, the led 
// is lit, the motor is moved from the STOPPOS degrees
// starting position until the switch is off, the led is 
// unlit and the motor returns to POS degrees

// Evolves from Shannon Complete Attiny85 to make it slower 
// by sending the degrees one by one 
// Detach evolution: to avoid inestability in the servo, 
// it is detached every time it finishes a movement
//Shannon Machine on an AtTiny 85


#include <SoftwareServo.h>  
// has been modified from the downloaded one to use Arduino.h 
// instead of Wsomething.h
// If you are using an Arduino instead of an AtTiny, you better use <Servo.h>
 
SoftwareServo myservo;  // create servo object to control a servo 


int switchVal=1; //variable to store the state of the switch

int ledPin=2;  // pin 2, output to the resistor and the status led
int servoPin=1; // pin 1, output to the servo control, yellow cable
int switchPin=0; // pin 0, input from the switch, pull up configuration

int stopPos=53;   // position in degrees of the motor while resting
int currentPos=stopPos;

 
void setup() 
{ 
  myservo.attach(servoPin);  // attaches the servo on pin 9 to the servo object 
  myservo.write(stopPos);    // initialize the servo to the stop position
    for (int i=0; i <= 20; i++){  // softwareServo::refresh must be executed 
                                  // every 50 ms to avoid unstabilization
    delay(25);
    SoftwareServo::refresh();
  }
   
  myservo.detach();
  
  pinMode(ledPin, OUTPUT);
  pinMode(switchPin, INPUT);
  
  digitalWrite(ledPin, LOW);
  
} 
 
 
void loop() 
{ 
  while (switchVal==1){              //if the switch is not activated, the loop is 
    switchVal=digitalRead(switchPin);// not broken and the rest of the program is not executed
    
    delay(15);
  } //end of while

  digitalWrite(ledPin, HIGH);

   
  delay(500);
  
  myservo.attach(servoPin); 
  
  while (switchVal==0){
    currentPos=currentPos++;
    myservo.write(currentPos);
    delay(10);
    SoftwareServo::refresh();
    switchVal=digitalRead(switchPin);
  } // end of while
  
  digitalWrite(ledPin, LOW);
  
  currentPos=stopPos;  
  
  for (int i=0; i <= 20; i++){  //softwareServo::refresh must be executed every 50 ms to avoid unstabilization
    delay(25);
    SoftwareServo::refresh();
  } //end of for


   myservo.write(stopPos);
   
   for (int i=0; i <= 40; i++){  //softwareServo::refresh must be executed every 50 ms to avoid unstabilization
    delay(25);
    SoftwareServo::refresh();
  } //end of for 
  

  myservo.detach();
  switchVal=1;
 
} // end of loop